Showing posts with label Tuesday Tips. Show all posts

Tuesday, January 19, 2010

Tuesday Tip: Clustering Those Embellishments

one of a kind girl

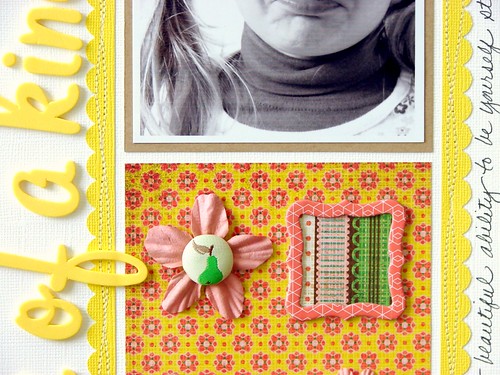
Aren't all those American Crafts chipboard frames included in this month's kit just simply adorable? They are perfect for housing mini-photos in, journaling, titles and even plain old patterned paper! Sometimes when designing a page you just need to keep it simple and that's what I tried to do when creating this layout featuring a photo that shares just how silly and strong-willed as well as confident my daughter is at this age! Instead of over-thinking things (which I sometimes can do when in a design rut), I started putting my frames over the striped sheet of Basic Grey paper that was in the January kit and discovered that I like how it looked! I clustered two frames and some of the fabric covered brads that I overlapped over flowers from my stash and put them all together and found that it added just enough interest to my page without taking away from my photo.
DSC05980

I loved the little fabric covered brad with the pear on it for this layout too...kind of fit in with my idea of being unique, seeing that it's the only 'food item' on the page, it seemed to work!

Be sure to check out the Mosh Posh Gallery to see how the other designer's used the American Crafts chipboard frames!

Tuesday, October 27, 2009

Snip, Snip...

...do you hear that? That is the sound of my scissors chopping up some patterned paper! You know what I am talking about...that paper that you love, but when you sit down to use it...it kicks your scrappy butt! It never fails that my most favorite piece of paper is the busiest, most bold of the entire line. So, what to do you may ask...CUT IT UP!!! Take a look at how I have done just that...

Happy late Tuesday...stay tuned the reveal is coming up!!

Tuesday, October 20, 2009

That Thing She Does

Well, I spent 10 plus hours at my LSS yesterday and I feel so inspired. It's just plain silly. Hopefully, I can share a bit of my inspo with you today. My sweet hubby watched the kids, fed them, cleaned up and even had Pumpkin Pie Cheesecake from The Cheesecake Factory waiting for me. Pretty nice, huh? I guess, after holding down the fort while he was gone for 7 months earned me that much, no?


While I was scrapping and chatting with one of my besties, I noticed me creating with one of my favorite go to techniques. I'm not even sure where it began, or even how. While looking through my Mosh Posh Gallery from last month here, I noticed that I used the pleating technique on three layouts, all with a different twist. To start a pleat, I just grab a scrap of a strip of paper 1/2 inch or an inch, or whatever suits my page. I bend it back and forth to form a pleat. Sometimes, it's a straight pleat sometimes it's a little haphazard.

In this first example, I ran the strip of paper through my Xyron "X" and started pleating away. To finish it off I trimmed the edges like you would a ribbon.


For this next one, I used a slightly wider strip and no adhesive. I just started bending back and forth. Once I had it the way I wanted it, I grabbed my stapler and joined the pleats. After that, I kind of roughed up the edges with my fingers. See, different look, same technique.


And in my last example, I used adhesive and finished off the ends like in the first one. But, this time I pleated left, right, left, right, left, etc. So, I could add threaded buttons to the centers of the pleats. See...

Well, that's all I have for tonight. Hope you enjoyed today's Tips on Tuesdays. I'm just about finished with my projects for November's Gallery. Stay tuned for that.

Tuesday, September 29, 2009

Sugar Pie

Good evening! Happy Tuesday... hope you've had a good day! I've got a few scrapbooking techniques & tips to share with you. Let me just go grab one of my favorite layouts from the September kit...


...awwww. I love that little sugar pie. What a sweetie. :)

Let's take a closer look at a few of the simple and effective techniques I used in this layout.

The first thing I did was print out this picture BIG, 8x10 to be exact. I'm very into big photos on my layouts lately. For me, they take the center stage and the details in the photo (like her blue blue eyes) are easier to appreciate when the photo is larger. Because the photo is sooo big I let the shape of the photo dictate a simple layout design on the Chocolate cardstock. Then I did some basic layering with the Lemonade patterned papers from the paper add-on and the Sweet Marmalade paper in the main kit. I just LOVE these two lines together. What a fun combination!


Once I had the foundation of the page down, it was time to add the fun details. This is my favorite part! The Jenni Bowlin border stickers with the opaline pearls layered on top worked nicely to bring a touch of femininity to the page. I used two borders on each side of the page to add some balance.


This page was just screaming for some of the yummy flower whimsies and blossoms in the embellishment add-on!!! I wanted then to have a more shabby appearance so I just crumpled them up. I put the diecut in my hand and just balled it up and then I smoothed it out again. The folded edges were raised a bit after I balled it up, so I lightly sanded the raised parts then I grabbed one of my small Martha Stewart ink pads and smoothed the color lightly over the top of the flower. I also created a large flower from the Lily Bee paper by drawing a flower shape and cutting it out. The ink pads were great for adding additional color to the edges of the flowers and on the crumpled areas. Then I layered the blossoms with buttons on top as centers. I added a few buttons and some ribbon from my own stash and the page was complete!

Oh wait! The title! A fun little technique is adding a little bling to the foam Thickers with a bottle of Stickles glitter glue. I just added it to the tops of the alphabets so it would look like it had a sprinkle of sugar on top.


NOW my page was complete! :)

Next time you're looking for a technique to try, crumple and ink it! It's addicting.

Tuesday, September 22, 2009

One Last Summer Hoorah!

I know it is the first official day of Fall, but if you are like me, that doesn't mean you are finished scrapping the last of your summer pics. With Halloween knocking at our doors, the September kit was just what I needed to wrap up my Summer photos. My layout, "Live, Laugh, Love" was adorned with 2 sweet pinwheels, just perfect to make you smile. So this Tuesday's Technique is a breezy, bright, and fun pinwheel!

Step 1: Gather supplies...double-sided patterned paper, paper trimmer, pencil, scissors, and a brad.

Step 2: Cut your patterned paper in a perfect square. For this tutorial, I cut the square to 5 inches.


Step 3: Draw a big "X" across the square. With the cross in the center of the paper and the ends of the "X" in the corners.


Step 4: From each corner of your square, cut towards the center of the square. DO NOT cut to the center of the square. Stop cutting at about 1/2 an inch before you get to the center.


Step 5: Now...if you look at your square you should have 4 triangles. Punch a hole in left hand corner of each triangle and the center.

Step 6: Fold over each of the punched corners to the center securing with a brad.


There ya have it! And here is how I used 2 pinwheels on my layout...


Tuesday, September 15, 2009

Putting Inspirations to Work-Stitching

Last Wednesday on Behind the Scenes Wednesday, I shared with you how I often find inspiration in my childrens' clothing. Remember that darling shirt of my daughter's? You know, the one with the "argyle" hearts. Well, I used that shirt as inspiration for one of my September DT layouts. Here's a little sneakie...

Next up I've gathered some of the tools I use when I'm hand-stitching on my pages. Bazzill makes some great templates that I use on many of my projects. (See the circle and border templates). You just line up the template and poke holes where you need them using a paper piercer (I use one from Close to My Heart) and a squishy mat (mine's from Scrapworks). For this layout, I needed a shape (an elongated X) that I didn't havce a template for. So, I used my trusty ruler and a pencil with the paper piercer and pad. You'll see the rest of this layout at 10 PM when we do the big Gallery Reveal.


Here's a peek at a project I'm about to start using the bits and pieces of my "old" Mosh Posh kits. Stay tuned for this and maybe I'll even throw in one of my world famous webisodes (teeheee).


And just for reading this far, here's a sneak peek of yet another project from September's Gallery Reveal. See you at 10 PM EST!


Tuesday, September 8, 2009

Branching Out

Welcome to Tuesday Tips! I love this picture of Breuklyn. She is growing up so quickly. I really wanted to incorporate a tree into this layout, but I have used trees on my layouts time and time again. I needed a new approach. I really wanted to think outside of my traditional scrapbooking supplies to create something a little different.

I believe that sticks from my backyard definitely qualify as "branching out." Get it? ha ha ha ha. It really doesn't take much to keep me entertained. Really, it doesn't.

I used DMC embroidery floss to attach the sticks to my cardstock. I like the extra texture that it adds. I stitched all of the leaves onto the tree using the same floss. I had a lot of fun creating this layout and I really liked that it looks different than other layouts that I have created.

Think outside of your comfort zone, you might be surprised what you will come up with! Happy Tuesday!! :)

Tuesday, September 1, 2009

Hand Stitching

Welcome to September!! First of all, have you seen the new design for the website?? The September kit has been posted and you should definitely check it out!!!

We have a brand new blog schedule that we are super excited to share with you! We, as a design team, hope to offer you inspiration, ideas and maybe a laugh or two. Just maybe. On Tuesdays we will be offering you ideas, techniques or tips for your scrapbooking projects. Are you ready?

99.5% of the time I hand cut my own embellishments. I love using up scraps of my patterned paper to create fun details for my cards or layouts. Looking at my circles and hearts above, it looks a little, well, boring. An easy (and super inexpensive!) way to liven it up a bit is to add some hand stitching.

DMC floss is really inexpensive. If you are really lucky you will have a sweet friend who will send you a ton of it just because she is amazing. (Thanks, Michelle!) Just grab an embroidery needle and a few colors of floss. You are ready to go. Be sure to use a needle that is meant for embroidery. It will have a slightly larger eye and will be a little stronger. It will need to be tough to punch through that cardstock! You can also use a hole piercer to make the holes.

The embroidery floss adds texture and color to otherwise plain embellishments.

What could possibly be easier than that?

Thanks so much for stopping by today! Be sure to check back in tomorrow for our Behind The Scenes post! There just might be a giveaway, wink. See you then!

  © Blogger template Brooklyn by Ourblogtemplates.com 2008

Back to TOP